


Exporting User Data
There are many reasons why you may need to export your users’ data. Maybe you want to email all of your clients and create an email list based on the addresses in the system. Or maybe you want to compare your payroll records to your caregivers in the system. Whatever the reason may be, here are the steps to successfully export the data you need.
Client Data
From the home page, go to Clients > Client Search. On this page, you can use as many or as few filters as you need to find the right group of clients. By default, if no filters are applied you will see all of your clients in the table at the bottom.

Filter Options
The following fields can be used to filter your clients into specific segments (A):
- First Name
- Last Name
- Phone Number
- Email Address
- City
- State/Province
- Zip or Postal
- Member Status (member or non-member)
- Status (inactive or active)
- Created (date their account was created)
- Service Area
- Corporate Client (yes or no)
Once you’ve selected the filters you want, click on ‘Search’ (B). Your filtered results will be shown in the table below. If there are more than 10 results, you can either adjust the number of results that are shown in the top left of the table (C) or scroll to other pages at the bottom of the table (D).
Exporting to CSV/Excel
To export your filtered data, tap on the ‘Export to CSV’ button on the top right of the table (E). This will download the full list of users you searched for and you will be able to open the file in a .csv or .xls format.
The data you export will include the following fields:
Client Data Definitions
Field |
Definition |
| Last Name | User’s last name |
| First Name | User’s first name |
| User’s email address on file | |
| Phone | User’s primary phone number on file |
| Service Area | Primary service area they are in |
| Status | Users’s current status within your business (active or inactive) |
| Type | Client’s membership status with your business (member or non-member) |
| Corporate Client | Indicates whether or not the user is a corporate client (yes or no) |
Caregiver Data
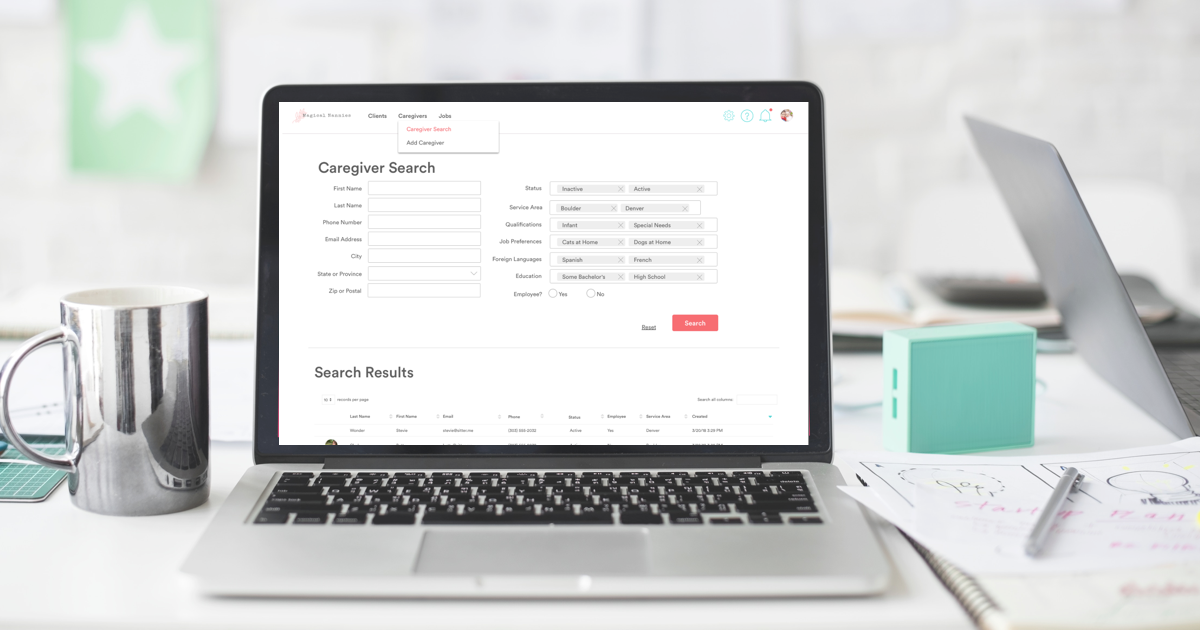
Exporting data for caregivers is very similar to clients, you’ll just find it in a different location. From the home page, go to Caregivers > Caregiver Search. On this page, you can use as many or as few filters as you need to find the right group of clients. By default, if no filters are applied you will see all of your caregivers in the table at the bottom.

Filter Options
The following fields can be used to filter your clients into specific segments (1):
- First Name
- Last Name
- Phone Number
- Email Address
- City
- State/Province
- Zip or Postal
- Status (inactive or active)
- Service Area (can select multiple)
- Qualifications (can select multiple)
- Job Preferences (can select multiple)
- Foreign Languages (can select multiple)
- Education (can select multiple)
- Employee (yes or no)
Once you’ve selected the filters you want, click on ‘Search’ (2). Your filtered results will be shown in the table below. If there are more than 10 results, you can either adjust the number of results that are shown in the top left of the table (3) or scroll to other pages at the bottom of the table (4).
Exporting to CSV/Excel
To export your filtered data, tap on the ‘Export to CSV’ button on the top right of the table (5). This will download the full list of users you searched for and you will be able to open the file in a .csv or .xls format.
The data you export will include the following fields:
Caregiver Data Definitions
Field |
Definition |
| Last Name | User’s last name |
| First Name | User’s first name |
| User’s email address on file | |
| Phone | User’s primary phone number on file |
| Status | Users’s current status within your business (active or inactive) |
| Employee | Indicates if a caregiver is classified as an employee of your business |
| Service Area | Service area(s) they work in |
Once you’ve exported your data, you can use it in Excel or any other spreadsheet tool as needed.